Tutorials
Installing on Windows Vista and Windows 7
We have had many issues with installing the AppliCad software (pre-v5.8) on PC's running Windows Vista and Windows 7 (along with just about every other software developer). The problem is not that it will not run or anything as dire as that. It is what Vista and Windows 7 does to the operator permissions - what it let's you do and what Windows does without telling you!
Note: These issues have been resolved in release v5.8 with the processes below set up during the install of V5.8.
Background
Windows Vista and Windows 7 is a beautiful looking operating system and has some very powerful built-in functions of enormous benefit to most computer users. However, it is an absolute pain to AppliCad in that it does not allow our software (or almost anyone's software in fact) to write directly to the ..\User folder because of where our ..\User folder is located.
The reason for this is that Microsoft were copping a lot of flack about potentially allowing viruses to be written into the Program Files folder. So, they effectively prevented it and, since our normal installation sets the normal user data path to the ..\User folder under the Program Files folder (as it has done for 20+ years ie C:\Program Files\AppliCad\<software>\User), it doesn’t allow us to write there either!
There is no doubt Microsoft were well intentioned in making these changes to their operating system. However, while these changes were good for Microsoft they had a dramatic effect on everyone else and none was very well documented. Windows did all these things without telling us or you and worse still, the changes they made they made hidden!
The bottom line is this - the AppliCad software is installed correctly, it's just that any changes you make are written to a location called the Virtual Store folder and this process is completely transparent to the operator and the files are tagged 'Hidden' which makes them difficult to find unless you are smart enough or are coached to change the attributes of the Windows Explorer files search engine. Not something a regular operator should ever need to do or worry about.
The Virtual Store folder is generally in the path of C:\Users\<<Normal Logon>>\AppData\Local\VirtualStore. This is away from the Program Files folder and satifies Microsofts requirement of not writing data to a folder or directory under \Program Files. If you make them visible by changing the attributes from 'Hidden File' or change the settings to make Hidden Files visible in your file lists, you will find a duplicate of all of the stuff you have created or changed.
So, how to fix this?
Short of turning off the UAC (User Access Control - the Vista section that creates and maintains the VirtualStore), the only real option we have is to create a User folder outside of the C:\Program Files folder. In future, the software will do this automatically for Vista installations, but we’re a little reluctant to do it since Microsoft are going to release a new operating system soon and things may change again.
So, follow these steps and then you will be operating normally with perhaps some more minor changes to come down the track:
1. Create a new folder
1.1 Create a new folder at the root level of the C drive as your User folder. We recommend you call it C:\AppliCad_User.
2. Copy files to the new folder
2.1 Copy all the files out of C:\Program Files\AppliCad\Sorcerer\User to this new directory C:\AppliCad_User.
2.2 Copy all the information from C:\Users\<<Normal Logon>>\AppData\Local\VirtualStore to C:\AppliCad_User. This may prompt to overwrite existing files with more recent files. You will normally answer 'Yes!' to this question.
Note 1: If you have just installed the software and not yet run it, there will not be any data in the VirtualStore folder to copy. So, with a new install you can skip this step.
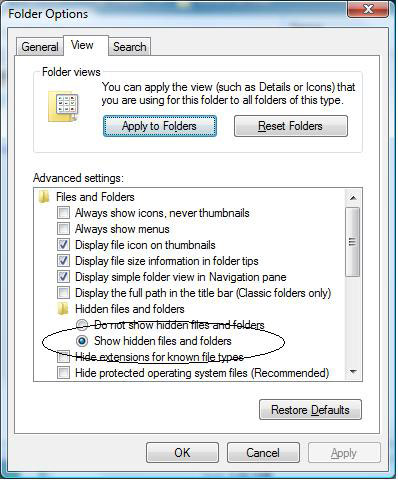
Note 2: If you cannot see the VirtualStore, it may still be a hidden folder. To "Un-Hide" the folder, go to the option at the top of the Windows Explorer screen, select - Organise > Folder and Search Options > View Tab and check the radio button "Show hidden files and folders" as shown below, and select Apply and OK.
You will now be able access the Virtual Store folder to copy the files to C:\AppliCad_User..
3. Set the data path for the program
3.1 Right click on the desktop icon for AppliCad, select Properties and change the Start-In path to C:\AppliCad_User.
3.2 Delete the folder from C:\Users\<<Normal Logon>>\AppData\Local\VirtualStore\Program Files\AppliCad\Programs
3.3 Now, start the software and for customers upgrading from a previous version, verify that it says V5.6 in the top left hand corner. If it does, proceed. If not, let us know and we will try to contact you to go through it. Finally, set your paths within the software as described below:
3.4 Check the Data File directory under Tools -> System-Preferences -> Data File Directory (Folder) and ensure it now points to C:\AppliCAD_User.
3.5 Turn on the right hand menus from the Pulldown Menu and select CAD -> Defaults -> System-Settings -> Directory and change the directory to C:\AppliCAD_User and finally select File -> Save-Values from the Pulldown menu.
Done!
Note: If you are on a network and the data or user folder is on a network server, say 'R:' drive or 'Z:', then the path as described above should be to that drive instead of 'C:' drive as explained above.
All should now be OK. Furthermore, any of the the problems of data appearing to disappear or change without your knowledge will now be sorted out.
Regards,
AppliCad Support Team